Real electronics
The project uses common resistors and capacitors, an 8-pin operational amplifier, a potentiometer, a DPDT switch, a stereo jack and a 9 V battery. The circuit is small enough to understand without being merely a demonstration toy.
LearnTronics Kit 0001
Build it. Understand it. Modify it. Install it.
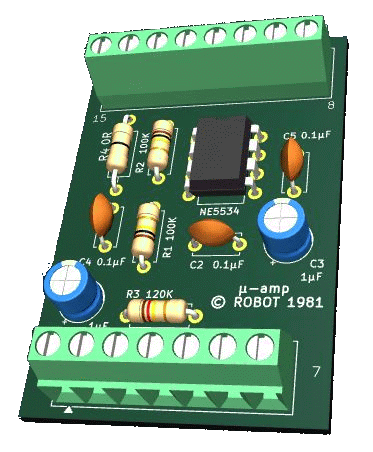
IN DEVELOPMENT — FINAL BOARD, CONTENTS AND PRICING TO BE SETThe µ-Amp is a compact, battery-powered onboard guitar preamplifier built around a single NE5534 audio op amp. As a LearnTronics kit, it can be more than a finished circuit: it can become a complete introduction to practical analog electronics.
The student follows the circuit from schematic to finished hardware, identifies and installs the parts, checks the board with a meter, follows the audio signal through the amplifier, and ends with a working device that can actually be used with a guitar.
The project uses common resistors and capacitors, an 8-pin operational amplifier, a potentiometer, a DPDT switch, a stereo jack and a 9 V battery. The circuit is small enough to understand without being merely a demonstration toy.
A guitar-playing student can hear the circuit working immediately and may choose to install the completed µ-Amp in an instrument. The finished project has a life after the classroom assignment.
Intended for first-time or classroom construction. The educational board can favor clear labeling and comfortable assembly over minimum physical size.
Intended for builders who want to continue beyond the stock circuit. This version can trade compactness for convenient access and reversible experimentation.
Exact contents will be finalized with the Student and Experimenter board designs. The following list establishes the intended starting point.
| Item | Purpose | Planned |
|---|---|---|
| µ-Amp printed circuit board | Main instructional circuit | Both versions |
| NE5534 audio op amp | Active amplifier device | Both versions |
| 8-pin DIP socket | Protects U1 and permits replacement | Both versions |
| Resistors and capacitors | Stock µ-Amp component set | Both versions |
| 500 kΩ potentiometer | µ-Amp gain / feedback control | Both versions |
| DPDT switch | Effect / bypass switching | Both versions |
| Stereo output jack | Audio output and battery switching | Both versions |
| 9 V battery connection | Standard power connection | Both versions |
| Color-coded hookup wire | Off-board wiring | Student Kit |
| Removable connector set | Plug-in off-board wiring and bench removal | Experimenter Kit |
| LearnTronics construction guide | Assembly, testing and study sequence | Both versions |
The µ-Amp can be used as an individual project, a lab exercise, or a final build assignment. A student can be evaluated not only on whether the circuit works, but on whether the student can identify the major sections, explain the purpose of the parts, perform basic checks and document the finished project.
Because the standard circuit uses a 9 V battery and a modest number of through-hole parts, the project can be kept approachable while still introducing genuine analog circuit behavior.
The kit page provides the physical package. The µ-Amp Project page provides the instructional presentation, while the Parts area provides deeper information on devices such as the NE5534.
Availability, final board layouts, package contents and pricing are still being developed. This page establishes the intended educational and experimenter direction.